Saturday, April 23, 2011

Underhammer Identity - Making Your Mark


Over the past few years of writing The Underhammer Society blog, I have received a number of photos from you readers asking for help in identifying some sort of unusual or unique underhammer firearm. It is so unfortunate that those inspired makers of old did not take the time to mark their work.

Today we see the same situation – underhammer (and other) makers who don’t mark their work. The simple rule should be that if your idea is worthy of the expense of money and labor to make it, it’s certainly worth marking it as yours.

However, doing so in a professional looking manner is generally not considered an easy task. Many of us have seen otherwise beautiful custom-made muzzleloading arms that were marked with poorly aligned lettering stamps or worse yet, marked with a “signature” on the top flat of the barrel that appeared to have been engraved by a dull screwdriver being driven by a 5 lb. sledge. The mark became a witch’s wart on the nose of a bathing beauty.

For years I have used an electro-acid etching system that does provide a very crisp and professional looking trademark. This is an industry standard metal marking process in which a stencil is used along with an electrolyte solution and a marking pad that is connected to a low voltage power source to deep etch metal parts. My marking results can be seen below.


We’ve all seen the results of this process as trademarks on such things as knives, firearms, feeler gauges, drill bits, milling cutters, saw blades, ball bearing races, carbide cutters and thousands of other types of metal tools, parts or instruments.

The problem with most pro-grade systems is that they can set you back up to a $1000. I bought rather used pro-grade equipment way back in ’96 and it cost me over $500 then - definitely out of range for the hobby builder and even some full time professional gunmakers.


The ETCH-O-MATIC comes complete with all you need to achieve professional marking results

Well, I’ve got some good news! Produced by Martronics Corporation, the ETCH-O-MATIC™ is a nifty, professional-grade, compact etching device that provides perfect marking, is quick and simple to use and costs less than $100 to get started.

No, that’s not a typo – it is less than $100. In fact, right now it's only about 80 bucks.

I could go into all the gory details of how the electro-etch process works, but the folks at Martronics had the good marketing sense to include several videos right on their website: http://www.etch-o-matic.com/eom.htm that clearly demonstrate just how quick and simple it is to use their system. Click on the link and take a look for yourself.

The ETCH-O-MATIC™ can be used for marking most any kind of metal including carbon and stainless steels, aluminum, brass, copper, bronze and carbide. It will even mark through black oxide on steel. Several types of marks can be obtained in addition to the simple black mark including the deep etch, a black deep etch and a frosty etch.


We have all seen the ETCH-O-MATIC marks on knives, tools and instruments of all kinds.

In the regular mode, a crisp black mark is left on the metal surface. For those who will be applying their own blue, brown or plating finish over the metal, there is a deep-etch adapter which will provide a mark with depth and will be readily recognized once you’ve finished the metal with your preferred finishing process.

Martronics’ ETCH-O-MATIC™ starter kit contains the ETCH-O-MATIC™ marker with the standard size marking head of 7/8" x 13/4", an electrical cord, ground plate, 2 oz. electrolyte solution in a plastic bottle, 10 special stencils, a neutralizer, deep etching adapter clip and complete instructions. Very simple and thorough instructions, I might add.

But, if that wasn’t enough, they also offer free technical help. Yes, you can actually call and talk with one of their live-person technical people who can help you get the optimum results from your ETCH-O-MATIC.

Martroncis claims that each kit will make approximately 1,000 marks before refill supplies are needed. Doing the quick math, you can see that each of your professional looking trademarks cost but pennies to apply and lends a look of professionalism that puts your work into the category of the big guys.

The ETCH-O-MATIC Starter Kit includes 10 sheets of a special stencil material which can be placed into an ordinary typewriter to make some quick stencils that will provide a good, legible mark. However, for the very best marking quality I recommend using their Dura-Film Stencils.

Martronics also offers a stencil making system that will allow you to make your own high-quality stencils from your own artwork on your home computer. If you’re interested, more information on their Stencil Maker Kit is available on their website.

For those of you who may not use very many stencils, Martronics will even make stencils for you – at a very reasonable price - if you send them your artwork. Talk about a full service company - I really like the way these people think.

Take a look at the website: http://www.etch-o-matic.com/eom.htm and see if you don’t agree that this is the best way to achieve a professional looking trademark on your fine firearms, or putting a good identifying mark on your tools and other valuable metal items as well.

So, that’s the story for the press and I’m sure you all now feel warm and fuzzy about it.

However, the real question on my mind is, “Will this eighty-dollar wonder work as well as my really pricey “professional” marking system?” We shall see.

I prepared a piece of flat bar steel by cleaning and lightly polishing the surface. I have to say that the folks at Martronics also provided us with a sample of their stencil material for comparison to the high priced “professional” stencils that I have been using for almost 20 years.

While Martronics indicates that you can hold the stencil in place, I have found that if you really want a crisp mark, its best to use some scotch or masking tape to secure the stencil to the work surface. This will also help assure that your alignment and position is correct before you start.


Clicking on the photo will provide a close up view, then click the Back button to return to the text.

The top mark in the photo above is the regular black etch while the bottom mark is the result of the deep etching process. Both were produced from the same blue Dura Film Stencil seen above the sample.

While we’re here I must admit that the quality of their stencil is first rate. I was really impressed with the durability of it and can see that you could easily get dozens of crisp, clear etchings from each stencil. The really good news is the price for their stencil making service. The company that I used in the past recently quoted their minimum charge is now over $70. Then there are graphics charges and plate charges, etc, etc…

That’s a lot of money for a small sheet of stencils. Especially if you only mark a few guns per year.

The folks at Martronics quoted $19.60 to make a 4” X 5” sheet – and that even includes the one-time $10.00 plate charge! If you plan and lay out your artwork carefully you can get quite a few stencils from that one sheet, They also offer larger formats all the way up to 8” X 11” if you need it, the price of which is only $54.50!

Now, back to the test.

I taped the stencil in place on the steel sample, plugged in the unit and wet the marking head pad with the included electrolyte solution according to the directions. Then I attached the ground wire to the steel sample plate and touched the ETCH-O-MATIC pad to the steel. Holding the unit on the steel for about 5 seconds produced the crisp black mark you see in the photo.

Martronics claims that their basic unit is also capable of deep etching which is necessary when you are planning to blue or brown or plate the finished metal.

For the deep etch, Martronics includes another special alligator clip that provides the DC current needed for the deep etch process. I simply connected that to the metal plate then attached the regular ground clip to it.

BTW, stencils can get “plugged” with the steel oxides that are created during the etching process, so it’s a good idea to keep the stencil clean with a bit of electrolyte or even soap and water between etchings.

To achieve the deep etch, it took about three applications of about 6 – 7 seconds each and the mark looks perfect. Just like I (used to) get from the high priced gadget with its cords and clips and plugs.

This Martronics ETCH-O-MATIC is just dirt simple and the results are certainly “professional” quality.


Check out their website: http://www.etch-o-matic.com/eom.htm because I believe you will find the ETCH-O-MATIC to be a most valuable addition to your shop for marking more than just your firearms.


Cheers!

.

Sunday, April 10, 2011

An underhammer punt gun???


Clicking the pics will enlarge them for closeup viewing. Clicking the Back button will return you to the text.

Over the past few years we have seen some interesting underhammer firearms that our readers have shared with us. However, this one surely takes the prize in the curiosa category.

It is a punt gun, and while punt guns are rather scarce these days, an underhammer punt gun is a real prize – if you collect really big shotguns, that is.


The owner of this monster bore, Jim Marsh, does collect really big shotguns and relates,

“This punt gun is from the 1870s and was said to be used for many years at an old Shooting Club (Duck Hunting Club). It weights about 100 pounds, is 6ft., 4 inches long and has a bore size of 1-1/2 inches. Also the gun has a rubber mount painted gray as seen in the picture below. 


The gun does not have any markings on it at all – nothing. I am an antique shotgun collector of big-bore shotgun and punt guns and anything about old time duck hunting. Although I have had this gun for many years, I have never found out anything about it. I hope The Underhammer Society readers can help identify it.”

 Regards,

 Jim Marsh

For those of you who are not familiar with punt guns, here’s a bit more info below from Wikipedia that will help in understanding these monster shotguns. 
                   
A punt gun is a type of extremely large shotgun used in the 19th and early 20th centuries for shooting large numbers of waterfowl for commercial harvesting operations and private sport. Punt guns were usually custom-designed and so varied widely, but could have bore diameters exceeding 2 inches (51 mm) and fire over a pound (0.5 kilos) of shot at a time.[1]


A single shot could kill over 50 waterfowl resting on the water's surface. They were too big to hold and the recoil so large that they were mounted directly on the punts used for hunting, hence their name. Hunters would maneuver their punts quietly into line and range of the flock using poles or oars to avoid startling them.

Generally the gun was fixed to the punt; thus the hunter would maneuver the entire boat in order to aim the gun. The guns were sufficiently powerful, and the punts themselves sufficiently small, that firing the gun often propelled the punt backwards several inches or more. To improve efficiency, hunters could work in fleets of up to around ten punts.


In the United States, this practice depleted stocks of wild waterfowl and by the 1860s most states had banned the practice. The Lacey Act of 1900 banned the transport of wild game across state lines, and the practice of market hunting was outlawed by a series of federal laws in 1918. In the United Kingdom, a 1995 survey showed fewer than 50 active punt guns still in use. UK law limits punt guns to a bore diameter of 1.75 inches (44 mm) (1 1/8 pounder).[2]


I have to admit that I have never seen an underhammer punt gun before and have no idea who could have made it. If any of you readers can identify it, please Post a Comment below to share your info with all of us.

Thanks, Jim, for sharing your unique and unusual prize with us.

It should be remembered that those of days of old who used these methods were not sportsman as we consider ourselves. They were market hunters and cared little about the balance of nature and no concept of conserving the resource. It was an attitude that prevailed at the time and resulted in the near extinction of many animals including our beloved bison.

A note in passing: it was Teddy Roosevelt who understood the dangers of this type of market slaughter and warned of the follies of such practices and worked diligently to stop market hunting. In that respect, he was one of the vanguard conservationists to whom we modern hunters owe a tremendous debt of gratitude.

Cheers!


.


Saturday, March 19, 2011

We're taking another poll...

Well, it's time, once again, for another survey.

As you seasoned readers may recall, we conducted a simple survey a while back which provided some interesting information about you, our readers.

For instance, we learned that most of you are target shooters. However, we also have a strong following of hunters and a few collectors as revealed in the chart below.

Target shooters..........................................27  (67%)
Hunters.......................................................21  (52%)
Collectors.....................................................6  (15%)
All the above…………....……………..........10  (25%)

You can see that the actual number of participants was rather low considering how many of you actually come by to read this stuff. It's apparent from the hit counter at the bottom of the page that we do get a lot of visitors here. In fact, we hold the Number 1 spot on all the major search engines when it comes to underhammers. That’s because you readers have put us there and we thank you for your on-going dedicated interest.


So, we’re asking for a bit more participation this time around. Sorry that we had to resort to threats from Voldemort this time to encourage your participation. From the low turnout as indicated by the chart above, it seems that our use of blatant sex last time around did not arouse as much participation as we thought it would. Go figure…

This time we would like to know a bit about your firearms choices. Specifically, how many of you are died-in-the-wool underhammer aficionados compared to cross-overs, that is, those of you who also shoot other cap guns, flint guns or cartridge guns.

We would also like to know what kind of muzzleloading arms you are most interested in purchasing – off the shelf production stuff, or custom-made arms.

Please scroll on down to the bottom of this page and take the survey. Just tick the box(s) that apply to you. What could be more simple?

THE POLLS ARE NOW CLOSED.  THE RESULTS ARE POSTED BELOW,

We would really appreciate your participation!

Questions of comments may be directed to: underhammers@safe-mail.net.

Cheers!


THE SURVEY RESULTS ARE IN!


First of all, I would like to thank every one of our readers who took the time to participate in the survey. There was a total of 76 respondents and the results are quite interesting to consider. Not surprisingly, there are really only a very few of you folks who are dyed in the wool underhammer shooters. I did suspect that there was a considerable crossover element, but I had no idea just how many of our readers are also of the cartridge crowd. Well over half of you shoot all manner of firearms. Great to have your interest.

Also quite surprising is the number of you readers who are also builders of your own firearms. That was most pleasing to see - a whopping 60%! With that in mind, in the future we will consider more information geared toward your interests in crafting your own arms.


The question of the survey was:

My shooting interests involve:

Underhammers only
  3 (3%)
Underhammers and other muzzleloading percussion cap arms
  13 (17%)
Underhammers and other percussion and flint ignition arms
  17 (22%)
Underhammers, cap, flint, and cartrdge arms
  52 (68%)
I prefer to buy completed off-the-shelf firearms
  22 (28%)
I prefer to buy custom firearms made to my order
  8 (10%)
I build my own firearms from kits or from scratch
  46 (60%)
None of the above - I'm just visiting
  4 (5%)

Again, thanks for your participation.

Cheers!


 .

Friday, March 18, 2011

Underhammer chunkin'

One of the oldest games around is chunk gun shooting. It is also one of the simplest, although not easy to win. Here is a report from one of our long-time readers, Jeff Bibb, about his recently finished chunk gun and a nifty "chunk" shooting bench that he now offers.

Just a reminder that clicking on any of the photos will enlarge them for more detailed viewing. Clicking the "Back" button at the top left of your browser will return you to the text.


Hello Roger:

Hope all is well with you these days. I keep reading the blog and enjoying the content. Folks seem to be building some really great pieces.

I thought you might be interested in my underhammer rifle. We talked about it briefly last year, but I have been very slow getting something together on it. This is a .54 caliber chunk gun made by Ed Rayl and Charles Bowers. To Ed's knowledge, it is the only all-stainless one in existence. 


For those not familiar with chunk gun shooting, this is a form of muzzle loading target shooting that has been going on in the Southern mountains for a long, long time. Basically, one shoots from a prone position over a log (or chunk) at an "X" target 60 yards away. The person who gets closest to the center of the X over a string of shots wins. These days, folks shoot flintlocks, percussion guns, and yes... underhammers. The competition is fierce, and a match may be won by a few thousandths difference.

This gun is a bit of a horse. It measures 71" long overall, and weighs just over 30 lbs. The barrel is 54" long, and 1.5" wide across the flats. It is entirely stainless steel, as is the action. 


The lock is a Charles Bowers and made from stainless. The trigger is light and has a crisp release. There is a half-cock notch. The action is fitted to a nice walnut, monte carlo stock with a steel buttplate. Length of pull is a bit over 14". 


Loads for the gun are very tight to produce the best accuracy. In this .54 rifle, a good starting place is a .530 or .535 ball with at least a .015 patch, and 100 to 110 grains of 2F. A custom made stainless range rod with a bore guide makes loading a bit easier. A step stool is also suggested. 


This rifle is quite accurate in capable hands (not necessarily mine), and has competed several times at the Alvin York Memorial Shoot in eastern Tennessee. Since that event is approaching this month I thought it might be appropriate to share the gun with you and your readers. Hope you all enjoy it.

As a full time artisan in the muzzle loading world, a surprising number of my customers are also chunk gun shooters. It is an addicting past time. As a result, last year I started making and selling a fully adjustable chunk or bench rest. 


All the best,

Jeff Bibb

All photos copyrighted by Jeff Bibb


Thanks, Jeff, for sharing your new rifle with us. As you shoot some winning targets maybe we can add them to the story.

If you would like more info on Jeff's shooting bench and other fine products, take a look at his site: 

http://www.jeffbibbpouchesandhorns.com/


Cheers!


.

Tuesday, February 8, 2011

1000-yard Underhammer


“Hi. I had a look at your blog and saw a lot of underhammer rifles, so I decide to build one for long-range target use.”

So began an e-mail that I recently received from a reader in Canada. I like that simple, straight forward, pragmatic approach – I needed one so, I decided to make one. Most people would start by looking for a rifle to buy, not by building their own from scratch - which is unfortunate.

Sometimes we let our fears take charge of our lives and consequently we miss out on a lot of opportunities and satisfaction. Not to play the schrynque here, but it’s true that many shooters who would love to have an underhammer rifle are just afraid to jump in and make one of their own.They believe they can't do it.

Well, friends, one thing that history has shown us clearly is that making underhammer rifles is not rocket science and most of you who want one are waaaay more qualified to build one than you might think. Aside from the barrel which is a Green Mountain offering, the rest of the rifle featured here was made with nothing more than a hacksaw, rasps and files, sandpaper, and a small drill press. No, I’m not kidding.

It was built in two months of winter down time by Patrick Chevalier. He said that he chose the underhammer action for its fast lock time, clean view of the sights, and the fact that it would not spit cap fragments into his face. He shoots 60 rounds a day in competition and says that he feels a lot safer with the nipple on the bottom of the barrel.


Clicking on any of the photos will enlarge them for detailed viewing.
Clicking the Back button will return you to the text.

Patrick said that he fabricated the action from steel plate. I was rather curious how he whittled a receiver from a steel plate and when I asked how he did it he said that he used the drill press to drill many holes to remove as much steel as possible. Then he filed the rest of the piece to shape and polished with various grades of sandpaper.


That was pretty much the same method for making the buttstock and forearm. Drill away the bulk of what doesn’t look like a rifle stock and then rasp and file the remains into submission. He explained that he needed a high comb stock for shooting at 800, 900, and 1000 yards. The high comb and rather slow pistol grip work well for Patrick’s Creedmore-style prone shooting positions.


From this seemingly crude methodology emerged a very sleek, accurate, and beautiful rifle.

While Patrick’s fabrication methods may seem simple, his basic mechanical design was sound. To achieve the best accuracy, assuming that you have a first-quality barrel, you need a rifle that is stiff and solid. To attain that stiffness it is important that the barrel and receiver be united as tightly as possible.

Toward that end, Patrick connected the barrel and receiver with a single ¾” X 16 TPI (threads per inch) breechplug that was screwed and seated into the barrel tightly; then he screwed the barrel into the receiver and torqued the two together. Then, perfect bedding of the receiver into the buttstock resulted in a very stiff rifle. BTW, Patrick also included a 5/8” deep Nock-type chamber in his breechplug for better ignition and cleaner burning of the charge.


Chevalier shoots 400-grain .40 calibre bullets ahead of 80 grains of FFg blackpowder.

A tapered .40 calibre Green Mountain barrel was chosen for the project. Being 1 1/8” at the breech and 1-inch at the muzzle and 32 inches long provides the balance and accuracy that Patrick required. Because the 1000-yard game requires long heavy bullets to win, a 1:16 inch twist was chosen to stabilize the 400-grain bullets on which this rifle feeds. Eighty grains of FFg seems to be the magic load that provides the perfect velocity to stabilize those long bullets with that really quick twist.


The mainspring/triggerguard of the Chevalier action slides along the 
bottom of the hammer when it is cocked. The leather hammer fob makes cocking
the rifle very easy especially from the strained Creedmore shooting position.

Patrick’s action is very simple; the hammer and trigger are tightly fitted into a separate lower tang and the trigger is also equipped with a sear engagement screw. Although the hammer does not have a half-cock notch, Patrick devised a simple sliding bar safety that consists of a bar which slides in a track that is inlet into the forearm. Sliding the bar to the rear blocks the hammer from reaching the cap.


 A simple sliding-bar safety was devised which blocks the hammer travel.

Both the hammer and trigger were cut from steel plate and the hammer was then fitted with a brass hammer “head” which was soldered onto the hammer body. The hammer head is also cupped to help contain the cap flash and fragments which is the curse of #11 caps.

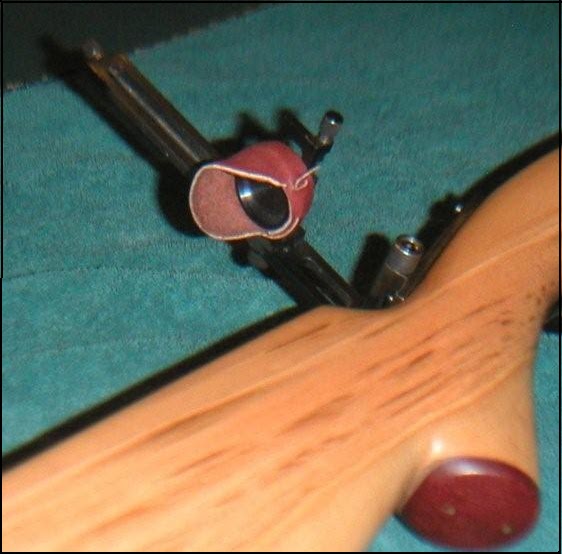
In addition to all the other interesting features of Patrick’s rifle, the rear sight is a Goodwyn-pattern as used on the Whitworth rifle in the late 1860s. According to Patrick the Goodwyn sight, as made by Ron Snover of Pennsylvania, allows for extreme windage adjustments up to 60 minutes left or right at 1400 yards. Patrick mentions that he has needed up to 48 minutes of windage adjustment at 800 yards when the wind was really blowing! He also made that nifty little sunbonnet for the eyecup.

Initially he mounted the sight on the top of the tang, but later inset it into the top tang for a cleaner appearance, which was a good call on his part as the resulting lines are indeed clean.


All in all the Chevalier is a very good design for a special-purpose rifle. Sometimes specialty rifles get morphed into forms that become unpleasing to the eye in order to satisfy the demands of function. But in this case, Patrick was able to balance form and function and honor the gods of aesthetics while pleasing the gods of mechanics with his clean lines and good craftsmanship.

Thanks, Patrick, for sharing your splendid rifle with us.

All photo copyrights claimed by Patrick Chevalier
.

Friday, January 21, 2011

Justin Bieber & Jaden Smith To Perform at Grammys Together

Justin Bieber, Jaden Smith and Usher will all be hitting the stage together during the 2011 Grammy Awards next month!


No word on what song they’ll be performing, but it’s said to be a “dynamic, energetic performance.”

Other performers at the award show include Bruno Mars, Katy Perry and Arcade Fire, among many others.

The 2011 Grammy Awards air live from the Staples Center in Los Angeles on Sunday, February 13th @ 8PM ET on CBS.

Justin Bieber “Mama’s Boy” Song

Here is yet another track from Justin Bieber to find it’s way online. The song is called “Mama’s Boy,” and it sounds like Justin recorded it quite a while ago. Chances are the song was set to appear on one of Justin’s previous albums, but never made the cut.